by David Sparks


RSS Sponsor:

Search
5:55PM

Can You Really Buy "Hip"?

Microsoft is getting lots of press about its $300M campaign to fix the Vista public image. My first thought is, "Why not spend $300M to fix Vista?" I have to admit I haven't used it much but there are no shortage of web reports by Windows enthusiasts panning it. I do know a few of the guys in the Microsoft Mac business unit and they seem to me like stand up guys trying to make a good product. Then again, they work on Macs.

Regardless, part of this campaign involves paying $10M to Jerry Seinfeld to pitch Windows along side that famous straight man, Bill Gates. This just seems wrong to me on so many levels. First, let me say as someone who has never met either man, I generally like and respect both Jerry and Bill. However, I don't see them making much of a difference for Visata's problem. From my very casual sideline seat, it seems to me that Microsoft is really losing this battle on the college campuses and 20-somethings. If they really wanted to stop the avalanche of switchers, they should use somebody younger than a 90's sitcom star (where his character always used Macs) and a retired CEO. Also, even if you could buy "hip", are these guys really selling it? Maybe I will be proven wrong but I'm already thinking these commercials are going to do more harm than good to Microsoft.
5:10PM

Mail Notification Liberation

emergency-3.jpg


A friend asked me how I can work without any mail notifications. Are you kidding me? How could I possibly work WITH mail notifications?

Apple has done a great job of building in several mail notifications into OS X. Mail.app can stick a badge in your dock and make a very cute little "dingy" sort of sound every time a new message arrives. That is not all though. Using third party software you can make your system growl and even shoot off fancy graphics every time you get a note from Amazon about something "you may want to buy" or even a message about "cheap prescription medication." I asked my friend, "How on earth do you get anything done with all those pyrotechnics?"

I just don't believe it is possible to keep your focus if your eyes and ears are trained to jump like a Pavlovian dog everytime someone (or somebot) decides to send you a note. Think about it. If you get an email every 5 minutes, that is 12 interruptions an hour and 96 interruptions in an 8 hour work-day. Just think how much faster you could work with 480 less interruptions a week.

This doesn't mean that I don't want my system to check email for me. I just want to be in control of the situation .. not the other way around.

The way I accomplish this is a few simple checkboxes in Apple Mail.

email settings 420.jpg


New Mail Sound: None = No ding.

Dock Unread Count: None = No tempting badge.

That is all there is to it. Note I did not turn off auto mail checking. When I do decide that I want to process mail, I want it already loaded. This gives me the benefit of current email without the devastating interruptions.

If you are carrying a smart phone, you also need to turn off the notifications there as well. On my iPhone it is done as follows:

mail notification.jpg


This is all found under the "Sound" menu of the "Settings" button. Before everyone starts firing up your email to me, I *know* sms notifications are still turned on. There are only a few people who text me and when they do, it (usually) is a legitimate interruption.
7:27PM

Inbox Mayhem

The Tools for Thought blog had a very good post today explaining you should never check your email.

"Never check email. Ever."

Instead, Andre recommends you "process" your email. This is very similar to my email workflow in that I deal with each item either immediately or dump it into OmniFocus for later process. I explained it in detail during the email sorcery screencast.

This stuff isn't rocket science, but it may help you build a rocket. How are you processing email?
8:21PM

More Free MobileMe

Mobile Me.png


Today Apple sent an email to me, along with countless others extending the "whoops" free period for MobileMe another 60 days.

The email reads ...

"We have already made many improvements to MobileMe, but we still have many more to make. To recognize our users' patience, we are giving every MobileMe subscriber as of today a free 60 day extension. This is in addition to the one month extension most subscribers have already received. We are working very hard to make MobileMe a great service we can all be proud of. We know that MobileMe's launch has not been our finest hour, and we truly appreciate your patience as we turn this around."

I know how fashionable it is to trash MobileMe, but I have to admit the service has been pretty stable for me (the first week excepted). I've come to rely upon the wireless calendar sync. I think the most encouraging part of this experience is the way Apple has stepped up both with their extension of time credit and their commitment to fix things. Now if Apple would just get a little better at that pesky communication issue.
10:38AM

Noise Ninja Review

noise ninja sample.png

I hate using my flash.  Nothing destroys a picture more then the shiny foreheads, reflective eyeglasses, and the nuclear glow that show up in my pictures every time I pop open the built in flash.  Now I know there's a way to intelligently use the flash in your photographs.  My friend, Robert Lachman, is a wizard at it.  Unfortunately, I am not.  I would like to say this is a result of the fact I'm too cheap to buy a separate flash for my camera but, most likely, it boils down to fundamental incompetence on my part.

So my way to get around this problem is to simply not use the flash.  And my number one tool for this strategy is my very favorite lens, a 50 mm 1.4 aperture lens I affectionately call the “nifty fifty.”  This lens opens so wide, that I can use it to take dark pictures indoors and usually get away with it.  My secret, in addition to the nifty fifty, is my complete lack of respect for the ISO setting on my camera.  I often crank up the ISO setting to 400, 800, and even 1600 in effort to avoid using the dreaded flash.  The result of these high settings, however, is that the pictures come out noisy artifacts, grain, and otherwise don't seem to cut the mustard.

Newer cameras address this problem with better software and sensors that take much less grainy photographs at very high ISO settings.  While I'm not in the market for a new camera, I sure would like to get rid of that noise.  There just happens to be a software package made specifically for this problem.  I'm talking, of course, about Noise Ninja.

Noise Ninja is a well regarded stand alone application and Photoshop plug-in that allows you to remove noise from high ISO pictures.  Recently, a new version was released that includes an Aperture plug-in.  So now, as an Aperture user, I can round trip my photographs through Noise Ninja without exiting the program. Let me just say that this plug-in delivers. It allows you to send and multiple selections of photographs and applying Noise Ninja's secret sauce that does a very good job of taking noise out of my photographs.  It is painless to apply and provides noticeable results.

Noise Ninja Screen .png


When you first activate Noise Ninja, it gives you a variety of sliders to customize the noise reduction.  These include luminance, color, after sharpening. After playing with these for some time, I found the default automatic setting to work better than most of my alleged “improvements.”

There really isn't a lot to say about this application except that it works and is easy.  My attempts to repair noise with the built in Aperture filters often noticeably blurred the picture. Noise Ninja does a much better job at retaining the image integrity.

If you are adventurous with the ISO button on your camera, using Noise Ninja, you will be able to recover otherwise unusable photographs and you will find yourself becoming even more liberal with your ISO settings knowing you can remove a lot of the noise back on your Mac. Any pictures I now shoot with 400 ISO or greater now automatically get Ninja’d.

Noise Ninja can be purchased at picturecode.com.  There is a free trial and I highly recommend giving this one a try. The Noise Ninja stand alone application can run on OS X, Linux or Windows. They have plug-ins for Photoshop, Photoshop Elements, and Aperture. They also have a variety of licenses ranging from $35 to $80.

You can listen to this review on MacReviewcast #173.
9:51AM

Glims: Inquisitor Killer?

The last few days I've been running a beta of Glims. It is a new application that adds Inquisitor like functionality to your search bar and then some. First, Glims gives you the familiar "Top 3 Dropdown" that we get with Inquisitor.

Glims 1.png


Additionally, however, it gives you a drop down on the search bar that lets you choose your search engine. I find this added feature very convenient.

Glims 2.png


That is not everything though. Glims adds quite a bit of additional functionality including:

* Adds thumbnails to Google.com search results
* Adds thumbnails to Yahoo.com search results
* Adds search engines to the default Google search tab
* Adds full-screen browsing capability
* Adds Favicons to tab labels
* Undo "Close Tab" (cmd-z)
* Re-opens last session when Safari starts
* Auto-Close download window
* Type-ahead support (auto cmd-f)
* Sets the focus on the search field when opening a new window
* Adds Amazon's information banner on Google.com search results
* Adds Amazon's information banner on Yahoo.com search results
* Adds a "Max Window Size" menu item to resize the Safari window

Glims 4.jpg


So far I'm really liking it. If you are feeling dangerous and want to play with Beta software, give it a spin yourself.
11:19PM

Hydra HDR Samples

Hot on the heals of my Hydra review, I went to The Great Park with my family this evening and got some great shots of and from a huge orange balloon. Because the balloon was always motion I wasn't able to effectively use bracketed shots. Instead I took one image shot in RAW and made two copies of it. I then set the exposure rates high and low and sent them into Hydra. Take a look at the results and let me know what you think.

Big Park 08-08 48420 w.jpg


Big Park 08-08 51420 w.jpg


Big Park 08-08 63420 w.jpg


Big Park 08-08 62420 w.jpg


Big Park 08-08 49420 w.jpg


Big Park 08-08 50420 w.jpg
9:00AM

Hydra HDR Software Review

hydra128_sidebar.png


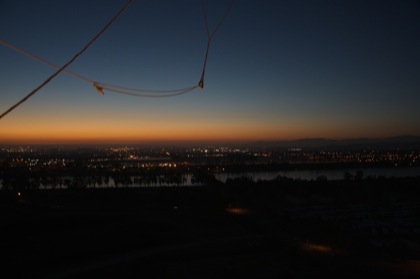
The latest rage with digital photography is high dynamic range imaging. The problem faced by anyone holding a camera is that the dynamic range of their camera sensor is a fraction of that available to the human eye. Put simply, that gorgeous sunset and dark foreground you're looking at simply cannot be captured with a single exposure from your camera.

This is where your Mac comes to the rescue with high dynamic range imaging, often referred to as HDR. Using HDR, you can take three shots of the same thing, one that is over exposed, one that is underexposed, and one that is just right. If you are really tricky and there is enough data in your image files, you can even make three copies of a single shot with different exposure levels. HDR software can then take these three images and combine them on your computer. This allows you to combine a gorgeous sunset with a foreground image. The results of this process vary from spectacular too surreal.

This week I'm taking a look at a software application designed specifically for the Mac to make HDR photography available to the masses. I'm talking about Hydra 1.6 from Creaceed Software.

hydra_1_5_esque_textmedium.png


Hydra is unique in that the $60 license gives you both a standalone application and an Aperture plug-in. Interestingly, the two iterations of this application are not identical. While I generally prefer to use the Aperture plug-in for its ease of use, there are a few additional tools in the stand-alone version of Hydra that I really like. Fortunately, the developer informs me that with the next major release of Hydra, the stand-alone tools will catch up with the Aperture plug-in.

One of the first steps of HDR image processing is to make sure the three pictures are aligned. In this regard, the Hydra developers did a very good job. The software or the user can pick specific alignment points and get everything straight. While generally you’re supposed to take HDR bracketed shots on a tripod, this feature allows Hyrda users to process images without assistance of a tripod. The software aligns the images for you. This could be quite handy when sun begins to rise and you realize you left the tripod in your car. My tests with this feature showed that it did actually worked and, generally, the automatic alignment did much better than my manual attempts.

Regardless, once your images are aligned, Hydra combines them into one image with all of the dynamic range data. This is where the fun really begins. The Hydra standalone application has a convenient histogram that allows you to blend the influence of your various images. While it’s not that easy to describe, it is very intuitive when you start doing it. The histogram is not in the Aperture plug-in yet but this is one of the tools the developer assures me will be in the next major update around the new year. Once your images are tweaked just right, you can export it to 8-Bit TIFF, JPEG, or 32-bit OpenEXR.

While the Aperture plug-in does not have the convenient histogram yet, it does have a variety of sliders and checkboxes to customize your HDR image. Because it is part of the plug-in architecture, all of this is done from within Aperture making the process of exporting images out for HDR and then dropping the finished product package back into your library quick and painless.

Creating an HDR images is much more an art than a science. Every picture is different and the tone map balance is never the same. For this reason, the real-time preview is a blessing. Also, like so many up-and-coming image applications on the Mac, Hydra takes advantage of your graphics card. The wait time to combine three RAW images on my MacBook Pro into an HDR image with Hydra's Aperture plug-in was less than one minute. Obviously, your mileage may vary.

One problem I had was that Hydra stripped some of my metadata from its finished image. My lens information was gone and Hydra appended its name to my camera type. I understand the exposure information is probably no longer relevant but the lens information is very helpful and should remain. Again, the developers are already aware of this and a fix is in the works.

I think some comparison with the other popular HDR applicaiton, Photmatix, is appropriate. I own a license for Photomatix and have used it for some time. At $99, a Photomatix Pro license costs $40 more than Hydra. Having used them both I would say that Photomatix has Hydra beat with respect to the number of controls and adjustments. You can get very specific with the modifications to your image in Photomatix. With respect to the final product however, I couldn't really tell much of a difference. This may be more a function of my lack of skill with Photomatix's multiple controls but it also makes a point. If you are not looking for the most complex program but still want to make nice HDR images, Hydra may be in your sweet spot. Another point in Hydra's favor is that it was created by a Mac developer and looks like it. It has a nice interface and doesn't feel clunky like so many multiplatform applications. Fortunately, both Hydra and Photomatix have trial versions so you can give both a try and see which works best for you.

Hydra requires MacOS X running leopard 10.5.4 or later. While the developer says it can run on a Power Mac, they "highly recommend" you run it on an Intel Mac. Head over to their website and give it a try.

You can listen to this review on the MacReviewCast episode 172.
11:25PM

AppStore Picks: Note2Self

note2self.gif

I'm going to start an irregular series of iPhone application recommendations. My first pick is a great little voice recorder called Note2Self. This application scratches a particular itch for me. You see, I have this problem. I'm a scatterbrain. I can be just about anywhere and think of something I need to do. The problem is, a few minutes later I may just completely forget that thought entirely. So there you have my problem. How do I capture those thoughts before I experience my own Ram flush? I've used a variety of tools for this problem including Moleskines, Jott, and the ever present Napkin.

Note2Self is my most recent tool in this arsenal. Once you activate the application it gives you a simple screen.
RecordingFinishedAnimation.PNG

You can either press the "Start Recording" button or just hold the phone up to your ear and it starts recording automatically.

It is that easy. I hold it up to my ear and empty my passing thought.

"Make plan for world domination with geeky Mac website."

I then lower the phone and it stops recording automatically and emails the audio file to my chosen inbox. When the personal RAM flushes (it inevitably will), it doesn't matter because the next time I check email I'll have a little audio file that reminds me to do something or add a task to OmniFocus.
Recording.PNG

You can download Note2Self directly from the AppStore for $2.99. You can learn more about the application at the developer website. Check it out.
10:46PM

The Ultimate Old School Apple Keyboard Hack

Keyboard Hack 2.jpg


I recently upgraded my MacBook Pro and I love it completely (almost). There is one problem. There is no Apple key. Now I know there was a lot of hubbub about Apple removing the Apple key from its keyboards last year. There were online petitions and a general nerd uproar. I have to admit the whole thing seemed silly to me until I got a Mac without the Apple key. Then I found I really missed it. I'm old enough to remember when the Apple key was everywhere in the Mac OS. It was not only on the keyboard but plastered all over the menus. Heck, I even remember when there were two different kinds of Apple keys. For me, the Apple key is an old friend down there on my keyboard and "part" of my computing experience.

So as I was using my shiny new Mac I found myself pining away for that Apple key. A good friend (who also happens to work for a certain fruit company) showed mercy and got me two slightly used Apple keys from an old MacBook Pro that just happen to be exactly the same size and design as the current "Command" key. It was sort of like receiving an organ donation, but for computers. With a little wiggling and a lot of help from said fruit-empoyed friend the command keys came off and the Apple keys found a new home. All is right in the universe once again.
Keyboard Hack 1.jpg


The now discarded "Command" keys sit in a drawer sadly like a discarded kidney, with full knowledge they will never get the geek affection bestowed upon my Apple keys.

Keyboard Hack 3.jpg